RaspberryPiとMacをLANケーブルで繋ぎ、双方向にSocketを使いデータ通信を行う方法をお伝えします。
Pythonだけで実装するのでMacでなく、WindowsやLinuxでも大丈夫です。
LANケーブルは直接RaspberryPiとMacに繋いでも大丈夫ですが、
Wi-Fi等で同じルーターに繋いであるだけでも大丈夫です。
双方向にデータ通信できますが、処理の流れ上サーバー側はどちらかを決めなくてはいけません。
サーバー側とクライアント側は1:Nになるので、その辺りを踏まえて決めれば良いと思います。
今回はRaspberryPiをサーバーにしていきます。
処理イメージ

RaspberryPiでサーバー側の実装
RaspberryPiの適当なディレクトに下記ファイルを作成します。MySocketServer.py
#!/usr/bin/env python3

import socket
import time

def start():
    with socket.socket(socket.AF_INET, socket.SOCK_STREAM) as streamSocket:
        # 10000番ポートでサーバーを立ち上げる
        streamSocket.bind(('0.0.0.0', 10000))
        # 1クライアントだけ受け入れる
        streamSocket.listen(1)
        # クライアントからの接続待ち
        clientSocket, addr = streamSocket.accept()
        # クライアントへメッセージ送信
        clientSocket.sendall(b'from server 1st message')
        time.sleep(1)
        # クライアントへメッセージ送信
        clientSocket.sendall(b'from server 2st message')
        # クライアントからのメッセージ受信待ち
        byteData = clientSocket.recv(1024)
        print(byteData)
        # クライアントからのメッセージ受信待ち
        byteData = clientSocket.recv(1024)
        print(byteData)

if __name__ == "__main__":
    start()
Macでクライアント側の実装
Macの適当なディレクトに下記ファイルを作成します。MySocketClient.py
#!/usr/bin/python3
import socket
import time

def start():
    with socket.socket(socket.AF_INET, socket.SOCK_STREAM) as streamSocket:
        # RaspberryPiへ10000番ポートで接続
        # ラズパイはデフォルトでraspberrypi.localというPC名が設定されています
        streamSocket.connect(('raspberrypi.local', 10000))
        # サーバーからのメッセージ受信待ち
        byteData = streamSocket.recv(1024)
        print(byteData)
        # サーバーからのメッセージ受信待ち
        byteData = streamSocket.recv(1024)
        print(byteData)
        time.sleep(1)
        # サーバーへメッセージ送信
        streamSocket.sendall(b'from client 1st message')
        time.sleep(1)
        # サーバーへメッセージ送信
        streamSocket.sendall(b'from client 2st message')

if __name__ == "__main__":
    start()
サーバー側の実行
RaspberryPiでサーバー側を実行しますpython3 MySocketServer.py
クライアント側の実行
Macでクライアント側を実行しますpython3 MySocketClient.py
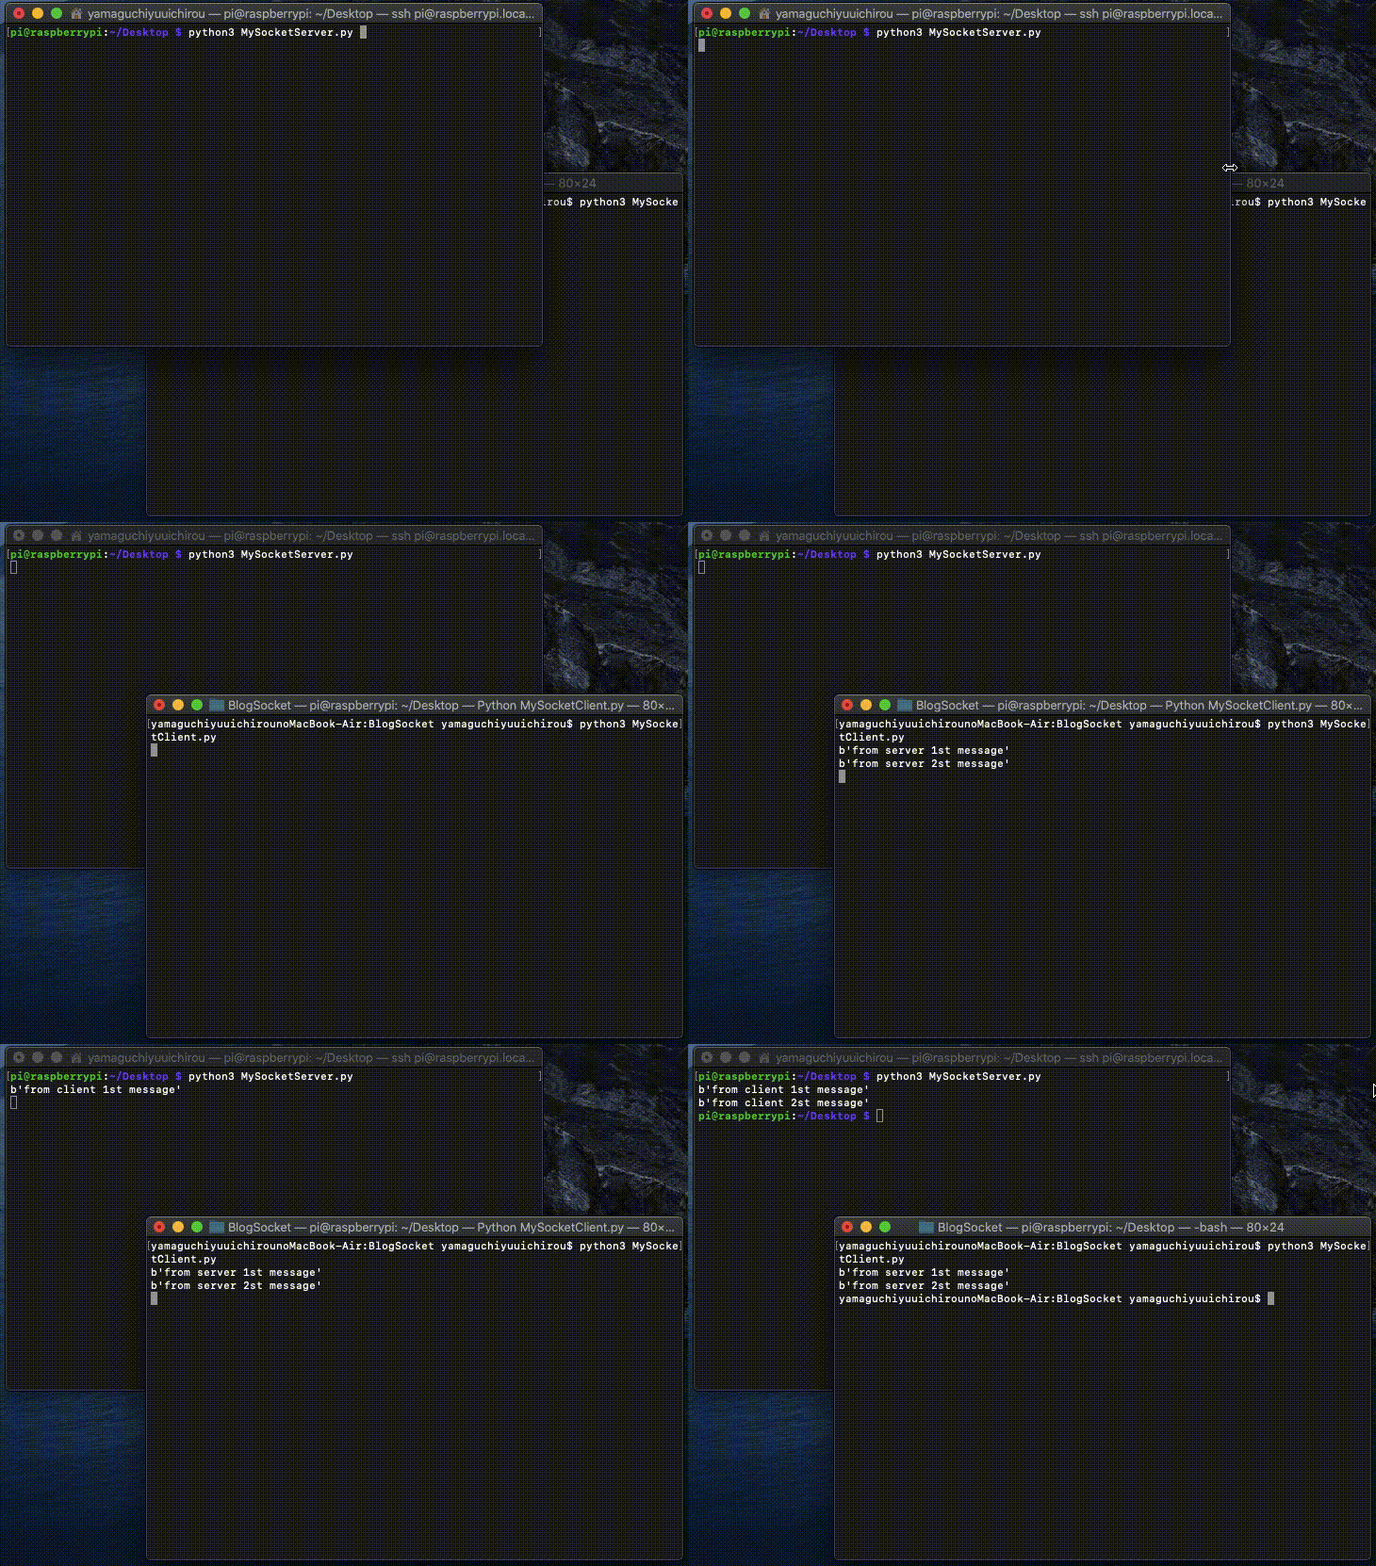
実際の動き
 Mac(クライアント)からRaspberryPi(サーバー)へメッセージを2回送信した後、
RaspberryPi(サーバー)からMac(クライアント)へメッセージを2回送信したのが確認できます。
今回はサーバー側からでもクライアント側からでも送信できることを確認するためにメッセージを2回づつ送受信しました。
実際に使用する時は受信側がWhile文でポーリングするのが一般的です。


